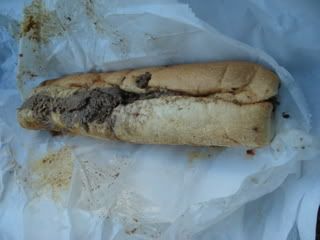
Spinach and Sun-dried Tomato Cannelloni with Butternut Squash Cream Sauce

I admit: I'm a butternut squash fiend. Soup, pasta, you name it, I'll probably love it. It seems to go well with almost anything. A few months ago, I was at a local restaurant that served sun-dried tomato and goat cheese ravioli in a butternut squash velouté. I thought I could duplicate the dish at home - maybe even make it better - and last weekend, I set out to prove myself right.
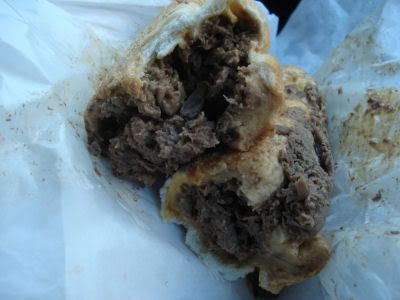
In short? I was oh-so-deliciously right. Instead of goat cheese and ravioli, I used oven-ready cannelloni shells filled with ricotta cheese, sun-dried tomatoes, and freshly wilted spinach. Then I covered it with an adaptation of Rachael Ray's Pumpkin Cream Sauce and baked it until the pasta was tender and the sauce was a-bubblin'.
Squash, sun-dried tomatoes and spinach might sound like a busy combination, but the flavours pair so well together. Squash lovers: you will love this.
Spinach and Sun-dried Tomato Cannelloni with Butternut Squash Cream Sauce
Serves 5-6 (3-4 cannelloni each)
Butternut Squash Cream Sauce
Adapted from Rachael Ray's Pumpkin Cream Sauce via Tart Reform
2 tablespoons extra virgin olive oil
1 onion or 4 shallots, finely chopped
Salt and pepper
Cooked, pureed flesh from a 2 lb. butternut squash (or a box of frozen butternut squash puree)
1 cup half-and-half
1/4 cup water or chicken stock
1/2 cup grated Parmigiano-Reggiano cheese
1. In a large pot of boiling, salted water, cook the pasta until al dente. Drain, reserving 1 cup pasta cooking water.
2. In the same pot, melt the butter over medium-low heat. Add the onion and season with salt and pepper; cook, stirring, until softened, about 6 minutes. Stir in the pumpkin and heavy cream and bring to a boil. Return the pasta to the pot along with the reserved pasta cooking water and toss. Stir in the parmesan; season with salt and pepper.
3. Top the pasta with the parsley and more parmesan.
Spinach and Sun-dried Tomato Cannelloni
Approximately 20 cannelloni tubes, oven-ready
1 tub ricotta (454g)
4 oz. fresh spinach, wilted and chopped (or frozen chopped spinach, defrosted and drained)
2 large sun-dried tomatoes, oil-packed, finely chopped
1 egg
Salt and pepper to taste
Preheat the oven to 350F.
With a fork, mix ricotta, spinach, and sun-dried tomatoes in a bowl. Season to taste with salt and pepper. Add egg and mix until ingredients are well-blended.
Using a pastry bag (or your well-washed hands), fill the oven-ready cannelloni tubes with the filling.
If you have already made the butternut squash sauce, spread 1/2 cup of the sauce over the bottom of a 9"x13" baking dish. If not, leave the filled cannelloni on a plate and continue making the pasta sauce, spreading the 1/2 cup of sauce over the baking dish when it is ready.
Next, place the cannelloni in the baking dish, over top of the sauce. Cover completely with the remaining butternut squash sauce.
Cover dish with aluminum foil and bake for 45 minutes, or until the pasta is tender.