Saturday, July 25, 2009

Herb and Parmesan Focaccia

There's something about baking your own bread that gives you a true sense of accomplishment. While my own bread-baking experience is fairly limited, aside from a dark rye bread I made in high school, I have made my fair share of focaccia. And the smell it creates while it's baking in my oven is enough to make me feel like a professional baker.


This Herb and Parmesan Focaccia, an Emeril Lagasse recipe, took that sense of accomplishment to another level. The lightly browned, herb-flecked crust made this easy-to-make bread look like something out of a gourmet bakery. Yet with the use of my stand mixer, it was as almost (but not quite) as easy as buying it pre-made. But it was certainly less expensive, and much fresher.

I sprinkled a combination of Italian parsley, basil, and chives on top, in addition to the Parmesan cheese. The chives were an unexpected flavour, since chives don't scream "Italian" to me like focaccia does, but I think they made this recipe special - with their light onion flavour, they added a brightness to the bread that really popped.

As my pots of herbs are growing like weeds in this very wet summer, I know I'll come to rely on this focaccia recipe to make good use of their yield.

Herb and Parmesan Focaccia
Modified from the FoodNetwork.com Emeril Lagasse recipe
Serves 6

1 1/2 cups warm water (between 110 to 115 degrees)
1 tbsp sugar
1 package yeast (equivalent to 8g or 2 1/4 tsp of yeast)
3 1/4 cups all-purpose flour (you may need more)
2 tsp salt, plus coarse or kosher salt for seasoning
2 tbsp olive oil
1 tbsp minced chives
1/2 tbsp chopped Italian parsley
1/2 tbsp chopped basil
1/4 cup grated Parmesan
Freshly ground black pepper

In a small bowl, dissolve the sugar in the warm water. Sprinkle the yeast over the mixture and let stand for 10 minutes until it foams.

In the mixer bowl with the dough hook attached, add 3 cups of flour, salt, and yeast mixture. Slowly turn it on and work the dough together. Turn it up to medium and mix for 5 minutes. If the dough is sticky, continue mixing and gradually add the remaining flour. Remove the bowl from the mixer. Pour a bit of oil over the ball of dough, turning the dough until it is coated in the oil. Cover the bowl with a tea towel and set aside to rise for 3 hours.

Preheat oven to 350 degrees. Spread the dough out on an oiled cookie pan or a parchment-lined pan and press "dimples" into it with your fingertips. Drizzle with the oil, herbs, cheese, kosher or coarse salt, and freshly ground black pepper. Bake until browned and cooked through and let cool.

Tuesday, July 21, 2009

Tuesdays With Dorie: Raspberry Blanc-Manger

Sometimes, you can spend months anticipating something - waiting, praying, hoping it will come - and when it arrives, it's even better than you were expecting.

But sometimes, all of your hoping and praying is for naught - the object of your desire is a dud.


This week, I've experienced a bit of both. The former, I'll save for a little later. The latter? It's all about this week's Tuesdays With Dorie pick, Raspberry Blanc-Manger. This week's selection comes to us via Susan of Sticky, Gooey, Creamy, Chewy.

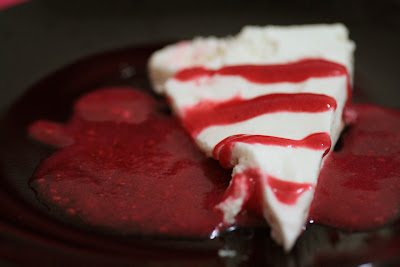
This blanc-manger is essentially a whipped cream cloud, with sugar, almond, and raspberries mixed in, which is set with gelatin.

It has been sitting there for the past year, tantalizingly, on the back cover of Baking: From My Home to Yours, just waiting for me to make it so I could enjoy its airy, fruity splendour.

But perhaps due to my own forgetfulness and finicky tastes, I didn't enjoy it.

To begin with, I absolutely detest almonds. I can't eat them unless they're coated in chocolate. This recipe calls for grinding almonds into dust, and they are a considerable component of the recipe. But I just couldn't do it. I wracked my brain for a possible substitute, but couldn't think of anything. I decided to carry on with the recipe, halved, and skipped the almond.


When the blanc-manger was assembled, I nearly poured it into ramekins. However, I had visions of a dainty wedge of blanc-manger on a plate, so I poured it into the recommended pan size for the full recipe - an 8" circular cake pan. It nearly filled the pan, and I couldn't imagine how double the recipe would have fit into it.

I refrigerated it overnight, and the next day after work, dunked the cake pan into warm water in order to loosen the blanc-manger from the mold. And then I walked away - leaving the pan (and the blanc-manger) in the warm water.

I came back half an hour to a creamy, soupy mess. I re-read the instructions - Dorie suggested putting the pan in the water for five seconds. Panicking, I stuck the blanc-manger back into the fridge. Although it did set up again, it had deflated and was about half as thick.

Although I knew my blanc-manger had already lost the beauty contest, I had high hopes for its flavour. But I found it to be rather bland and uninteresting - it tasted like eating whipped cream with raspberries in it. This could definitely be because I skipped the almonds, but either way, it seems like this recipe isn't for me. If you like almonds, though, I recommend checking out the recipe on Susan's blog.

On the bright side, my disappointment has been tempered by something major. Last fall, my oldest brother and his wife announced that they were expecting their first child. Since then I've been counting down, waiting to meet my newest family member and bond with him as I have my other niece and nephew.

Monday morning, just before 3 a.m., he arrived - a week overdue and after seemingly-endless months of anticipation. His name is Lachlan (like McLachlan, without the "Mc" - it's a Gaelic name), and based on the pictures I've seen, he is incredibly adorable.

I'll be heading home after work tomorrow to meet him, and then taking two days of vacation to hang out with the little guy. With any luck, I'll come back with permission to post a photo of him for your viewing enjoyment. After all of the waiting, I can't wait to finally meet him!

Sunday, July 12, 2009

Sweet Melissa Sundays: Lemon (Blue-Raspberry) Cheesecake with Cornmeal Crumb Crust


This week's Sweet Melissa Sundays pick, Lemon Blueberry Cheesecake with a Cornmeal Crumb Crust, gave me lots of practice in two cooking and baking skills that I find crucial: knowing how to successfully scale down a recipe, and substituting what you need with what you have.

Based on my title, you can probably guess where the first substitution came in: raspberries for blueberries. This one came about by accident: I really thought I had a good amount of blueberries stored up in my freezer, but when it came time to make the sauce, I realized that I was way off. I had 10 blueberries. 10! So I added in raspberries to make up the difference.

I also toyed a bit with the foundation of the recipe: the cheesecake batter. The original recipe, which serves 12, calls for four bricks of cream cheese and a full cup of mascarpone. There is but one of me, and I had just one brick of cream cheese, so I decided to make do with what I had. I quartered the recipe, and also substituted sour cream for the mascarpone. My fourth-grade division skills definitely came in handy.

The cornmeal crumb crust was left as-is, although also quartered. I patted it into the bottom of cupcake liners, baked it for about 10 minutes until it was browned, and then spooned the cupcake batter over top of it. After that, one cupcake pan went into a water bath, and the other didn't - a bit of an experiment. They were both done baking after about 40 minutes, but the water bath-baked cheesecake bites turned out much better than their counterparts, who bubbled violently and threatened to explode out of the pan.

I was extremely impressed with this recipe and how it held up to my substitutions and tweaking. It was very creamy and had a bright, intense lemon flavour. The blueberry-raspberry topping was a bit tangy, which complemented the sweet lemon filling perfectly. And by making bite-size versions, I was able to make more servings - that's healthier, right? That is, assuming you don't eat all of the servings on your own. Not that I did that, of course.

For this amazing recipe, visit Eliana of A Chica Bakes. And to check out the rest of the Sweet Melissa Sundays bloggers, check out the member list.

Tuesday, July 7, 2009

Tuesdays With Dorie: Tribute-to-Katharine-Hepburn Brownies


Long before the current landscape of fame, in which men and women become celebrities while having no discernible talent (I'm looking at you, Paris Hilton), being a Hollywood celebrity really meant something.

While there are still plenty of legitimately talented celebs out there - the Grammy and Oscar winners of the world come to mind - but when entertainment news tends to devote equal coverage to reality stars like Jon and Kate Gosselin as it does to Brad and Angelina, it makes me yearn for earlier days.

Sure, I wasn't born until decades after Hollywood's heyday, so maybe I hold a romanticized view of a past I wasn't even a part of. But when I think of true Hollywood glamour, I think of the heavyweights: Cary Grant, Marilyn Monroe, Grace Kelly, Spencer Tracy, and Katharine Hepburn.

I have to admit, although I knew her name well, I didn't see my first Katharine Hepburn movie until I was in high school, when I watched "Guess Who's Coming to Dinner?" She acted with so much passion. It seems that she lived her life in much the same way.

According to Dorie Greenspan's introduction to this week's Tuesdays With Dorie recipe, Ms. Hepburn gave the following advice to her neighbour's daughter: "Never quit. Be yourself. And don't put too much flour in your brownies." Katharine Hepburn was my kind of woman.

This recipe, based on brownie recipes attributed to Ms. Hepburn, is unique in that it has a few secret ingredients: a bit of cinnamon and instant coffee, and of course, not a lot of flour. It's also heavy on the cocoa powder and sprinkled with chunks of chopped chocolate, giving it a rather dark flavour. The cinnamon and instant coffee add complexity, but aren't overpowering.

Some TWD bakers felt that this recipe turned out rather gooey. I left out the requisite nuts called for in the recipe and baked the brownies for an extra five minutes and found that they had a perfect texture: dense, chewy, but not undercooked. Chopped up into little chunks, the brownies were perfect in homemade vanilla ice cream.

Check out our special guest host, Lisa of Surviving Oz, for the recipe.

Sunday, July 5, 2009

Sweet Melissa Sundays: Brown Sugar Vanilla Ice Cream with Brownie Chunks


This week's Sweet Melissa Sundays pick is Brown Sugar Vanilla Ice Cream, chosen by Karen of Karen's Cookies Cakes & More. I was also supposed to make chocolate or butterscotch sauce, but completely forgot. Oops! Instead, I chopped up a couple of Tribute to Katharine Hepburn Brownies from this week's upcoming Tuesdays With Dorie assignment, and happily added them to the just-made ice cream before storing it in the freezer to firm up.

I can be a bit of a cheapskate when it comes to my groceries. I've never bought a vanilla bean in my life (please don't yell at me!), and even though this recipe did call for one, I used my pure vanilla extract instead.

The recipe also called for skim milk powder, which I also skipped - I'm way too cheap to buy a big, expensive box of milk powder when this recipe only calls for 1/4 cup of it.

Other than that, the rest of the ingredients were typical baking staples: eggs, milk, cream.

Despite my frugal adaptations, this ice cream turned out beautifully. Melissa Murphy (the author of The Sweet Melissa Baking Book) promised that the skim milk powder would yield an extra-smooth and creamy ice cream, but my powder-free version was very creamy - it tasted sinful enough as it was. However, if I do ever find that I need to buy skim milk powder, I'll be sure to give it a try in this recipe.

In fact, I think this could become my staple vanilla ice cream recipe. The brown sugar added sweetness and depth of flavour, and the brown sugar-vanilla combination could be complementary to so many add-ins. Beyond brownies, I'm thinking chocolate bars, skor bits, or chopped m&ms. Yum.

Thank you, Karen, for your excellent choice! It's always fun to break out the ice cream maker. Visit Karen's blog for the recipe for the ice cream, as well as for the hot fudge sauce which I forgot to make.

Friday, July 3, 2009

Homemade Potato Gnocchi in a Pecorino Cream Sauce


Happy belated Canada Day to my fellow Canadians! Like many if not most Canadians, I enjoyed a day off Wednesday in honour of our nation's birth.

I thought it would be a perfect day to spend in the kitchen, and so I did. By day's end, I had made focaccia, brownies, and homemade potato gnocchi.

It was my first time making potato gnocchi, and while it was definitely time consuming, it was so worth it. I think there's very little that you can create in the kitchen that will make you feel as accomplished as when you make your own pasta.

Especially if you drizzle that pasta in a simply but elegant pecorino cream sauce. So how did it all come together?

First I boiled a few potatoes until they were tender, but not mushy. Then I used my nana's potato ricer, given to me by my mother, to crush the potatoes into smithereens. I mean, to squeeze them into delicate strings.

It felt great to be using kitchen equipment that belonged to my Nana. She died over 10 years ago, and whenever I use something that belongs to her it makes me feel connected to her still.

So after the potatoes were sufficiently obliterated (thanks, Nana), I mixed them with flour, ricotta, egg, parmesan, salt, pepper, and freshly grated nutmeg. The dough was tasty but still neutral-flavoured, ready to be rolled out, cut, and coated in the type of sauce that makes your mouth water.


While I cooked the fresh gnocchi for about 5 minutes, I heated heavy cream in a saucepan and then melted in an equal amount of grated pecorino cheese, then seasoned the sauce with a generous sprinkle of black pepper and a bit of salt.

The sauce was rich, so just a bit of it went a long way. At the same time, I appreciated that the sauce didn't have any butter - typical alfredo-style sauces do, so it was a bit lighter in calories than your average cream sauce. I loved how the sharp pecorino and pepper were carried by the mildly flavoured gnocchi. And I especially loved that the sauce was easy and quick to make, but so elegant and tasty.


This recipe makes enough for four servings of pasta, but if you're a smaller household like me, you can freeze the rest of the gnocchi to enjoy later.

The gnocchi recipe is from Canadian chef Anthony Sedlak.

Potato Gnocchi with Pecorino Cream Sauce
Serves 4

Gnocchi
1 1/2 pounds baking potatoes (like Russet)
1 x egg
1/4 cup ricotta
1/4 cup grated parmesan cheese
1 1/2 cup flour, plus more for dusting
Pinch grated nutmeg
Salt and pepper to taste

Pecorino Cream Sauce
1/2 cup whipping cream
1/2 cup freshly grated Pecorino Romano cheese

Directions:

Gnocchi
1. Add whole potatoes to a medium pot and fill with cold water just to cover. Season cooking water with salt and bring to a boil; lower heat and simmer until potatoes are tender but not overcooked (this could take 20 or more minutes - I recommend checking every 5 minutes after the 10 minute mark). Drain potatoes and let dry out slightly. While still warm, peel skin off potatoes, cut into quarters, and push through a ricer or food mill. Gently combine riced potatoes with remaining ingredients, being careful not to overmix. On a floured board, divide dough into six pieces and roll each piece into a ¾ inch thick log. Cut each log into ½ inch long pieces. If desired, roll each piece on the back of a fork to create ridges. Lay out cut pieces on a lightly floured tray. To cook, bring a large pot of salted water to a boil. Boil in batches, dropping in a few at a time; gnocchi are ready when they float to the surface (approximately 5 minutes). Remove with a slotted spoon and place on plates.

Pecorino Cream Sauce
1. Bring cream to simmer in a frying pan over medium-low heat. Add Pecorino, stirring until melted. Season to taste with salt and pepper. Drizzle sauce over plated pasta.

  © Blogger templates 'Sunshine' by Ourblogtemplates.com 2008

Back to TOP