Friday, October 10, 2008

Four Foods on Friday #50

Four Foods on Friday time again! This time I'm sharing the recipe for my favourite non-boxed macaroni and cheese.


Photo Credit: Very Best Baking
#1. Pasta. How do you tell when it’s done? Do you cook on medium or high?
I just bite into it. If it's too chewy, the pasta keeps cooking. I always seem to burn my tongue, though, so if my boyfriend's around, my preferred method is to ask him to check it. I swear his mouth is invincible.

#2. Deep frying. What kind of oil do you use?
Vegetable oil, all the way.

#3. Grilling. Do you grill on foil or directly on the grill?
I always grill fish on foil -- it falls apart too easily. Meat and veggies typically go right on the grill.

#4. Share a recipe that involves cooking something two different ways. Example, for lasagna you might fry the meat and bake the whole dish.
Well, this might be more than two ways, but when I think of something that's made on the stove top and then baked in the oven, my mind goes right to my favourite mac and cheese recipe.

It's adapted from a recipe on Very Best Baking.

Traditional Macaroni & Cheese
6 servings

Ingredients:
* 1 2/3 cups dry elbow macaroni, cooked and drained
* 2 tablespoons cornstarch
* 1 teaspoon kosher salt
* 1/2 teaspoon dry mustard
* 1 can (12 fl. oz.) Evaporated Milk
* 1 cup water
* 2 tablespoons butter or margarine
* 2 cups (8 oz.) shredded cheddar cheese, divided
* Ground black pepper to taste
*Seasoned bread crumbs

Directions:
Preheat oven to 375° F. Grease a 9"x9" casserole dish.

Combine cornstarch, salt, mustard and pepper in medium saucepan. Stir in evaporated milk, water, and butter (or margarine). Cook over medium heat, stirring constantly, until mixture comes to a boil. Boil for 1 minute. Remove from heat. Stir in 1 3/4 cups cheese until melted. Add macaroni; mix well. Pour into prepared casserole dish. Top with enough bread crumbs to lightly cover the macaroni, and sprinkly remaining cheese on top.

Bake for 20 to 25 minutes or until cheese is melted and light brown.

Wednesday, October 8, 2008

Homemade Soft Pretzels

For as long as I can remember, I have loved cotton candy. I would beg my parents for a bag whenever we visited our town's summer fair, and I always devoured the bag in a matter of hours. Now, I'll attend fairs just to buy cotton candy. It's sad, really. But as much as I love cotton candy, I will never be able to make my own (rentable cotton candy machines aside). And that is a shame, because I'll only enjoy it at summer fairs. Eight or more months without something so sickeningly sweet and delicious? A near-tragedy.

But there's some consolation: there are other festival foods that you can make at home. Candy apples, caramel corn, and my personal favourite: soft pretzels.

Soft pretzels are just a bit more difficult to prepare than a typical pizza dough recipe. Once the dough has risen, you divide it into pieces, roll it into ropes, shape it in the typical pretzel shape, and toss it in a boiling baking soda/water bath for 30 seconds a piece. A little labour-intensive, but not much when you consider how spot-on the recipe is. You'll swear it's festival grub.


Served warm and alongside melted Cheez Whiz that's been diluted with a splash of milk -- it's not healthy, but to me, it's necessary -- you'll have a hard time paying $3 or $4 a pretzel from now on.

Homemade Soft Pretzels - Recipe from Alton Brown & Food Network
Yields 8

Ingredients
* 1 1/2 cups warm (110 to 115 degrees F) water
* 1 tablespoon sugar
* 2 teaspoons kosher salt
* 1 package active dry yeast
* 22 ounces all-purpose flour, approximately 4 1/2 cups
* 2 ounces unsalted butter, melted
* Vegetable oil, for pan
* 10 cups water
* 2/3 cup baking soda
* 1 large egg yolk beaten with 1 tablespoon water
* Pretzel salt

Directions
Combine the water, sugar and kosher salt in the bowl of a stand mixer and sprinkle the yeast on top. Allow to sit for 5 minutes or until the mixture begins to foam. Add the flour and butter and, using the dough hook attachment, mix on low speed until well combined. Change to medium speed and knead until the dough is smooth and pulls away from the side of the bowl, approximately 4 to 5 minutes. Remove the dough from the bowl, clean the bowl and then oil it well with vegetable oil. Return the dough to the bowl, cover with plastic wrap and sit in a warm place for approximately 50 to 55 minutes or until the dough has doubled in size.

Preheat the oven to 450 degrees F. Line 2 half-sheet pans with parchment paper and lightly brush with the vegetable oil. Set aside.

Bring the 10 cups of water and the baking soda to a rolling boil in an 8-quart saucepan or roasting pan.

In the meantime, turn the dough out onto a slightly oiled work surface and divide into 8 equal pieces. Roll out each piece of dough into a 24-inch rope. Make a U-shape with the rope, holding the ends of the rope, cross them over each other and press onto the bottom of the U in order to form the shape of a pretzel. Place onto the parchment-lined half sheet pan.

Place the pretzels into the boiling water, 1 by 1, for 30 seconds. Remove them from the water using a large flat spatula. Return to the half sheet pan, brush the top of each pretzel with the beaten egg yolk and water mixture and sprinkle with the pretzel salt. Bake until dark golden brown in color, approximately 12 to 14 minutes. Transfer to a cooling rack for at least 5 minutes before serving.

Tuesday, October 7, 2008

Happy Birthday to Him: No-Bake Chocolate Cheesecake

My boyfriend's 21st birthday was just over a week ago. Considering that I bake sweets for him almost every week for when we're together on the weekends, I knew I'd have to really ramp up my efforts for his birthday.


I wanted to make something that incorporated his love of chocolate and brownies and also required the kind of effort befitting the birthday of someone so spectacular. Something that would come together in many stages over several days. Something that would be not just a mouthwatering dessert but also, almost, a symbol of how much I love him and how happy I am that he was born -- cheesy, I know. Anyway, I had my eye on a fudgey brownie cheesecake with a chocolate glaze -- like two desserts in one. Twice the effort, and, I figured, doubly symbolic of my appreciation.

My boyfriend, on the other hand, had other ideas, namely -- and very enthusiastically -- "No bake chocolate cheesecake!"


His mom has a recipe for no bake chocolate cheesecake that he absolutely loves. It's really simple -- cream cheese, sugar, Cool Whip, chocolate chips, and some melted chocolate mixed together and poured into a pre-baked graham cracker crust. The result doesn't taste like some fluffy cheesecake knockoff. In fact, it tastes just as rich and dense as a baked cheesecake, likely because of the melted chocolate. With the homemade graham cracker crust, it's just as impressive. In fact, if you made the cheesecake in a springform pan and drizzled some melted chocolate over the top of it, your guests would be hardpressed to guess that it takes about half an hour to put together. You can see how dense the cake is in this photo:


I amped up the chocolate flavour by making a homemade graham cracker crust with some cocoa powder added in for good measure, but forgot to include the chocolate chips. No matter, because the pie plate was nearly overflowing as-is.

I normally prefer real cheesecake to the no-bake variety, but this recipe -- when it comes to chocolate cheesecake, anyway -- has changed my mind.


No-Bake Chocolate Cheesecake
Serves 8

1 1/2 c. semisweet chocolate chips
1 1/2 packages (8 oz., 250 g.) cream cheese, softened
1/2 c. sugar
1/4 c. butter (softened)
2 c. frozen whipped topping (thawed)
1 - 9" graham cracker pie crust - or make your own and mix in about 1/4 cup of cocoa powder
Chocolate chips (optional)
Melt the chocolate chips in a saucepan until smooth and set aside. This can also be accomplished using the microwave on low-med power, but watch carefully or the chocolate will burn.

On low speed, beat cream cheese, sugar, and butter in a bowl until smooth. Blend in the melted chocolate and fold in the whipped topping (and optional chocolate chips). Spoon into graham crust, smooth top with a spatula, and cover and chill until firm.

Friday, October 3, 2008

Four Foods on Friday #49

Another round of Four Foods on Friday! This time I'm including a recipe for my favourite quick meal, which, surprisingly, I've never taken a picture of! Something to add to the to-do list the next time I make it.

#1. Turnips. Love em or leave em?
I know it's childish, but yuck! The closest I can get to turnips is parsnips. Those are delicious roasted with sweet potatoes, carrots, and a little maple syrup.


#2. What’s your favorite roasted dish?
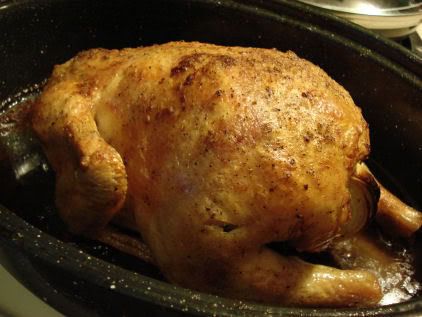
Roasted chicken! It's so delicious and surprisingly easy. And chicken gravy is amazing.

#3. Salsa. What kind do you like?
Medium spiciness, and homemade, if possible. I've never had mango salsa or peach salsa or anything like that, although I keep meaning to try. Anyone know of a good recipe?

#4. Share directions on how to make your favorite quick meal, meaning start to finish in about 30 minutes or less.
This is my favourite quick meal lately, because it's really fast, but the blue cheese makes it taste elegant. It's even faster if you cook the pasta the night before, mix it with the shallot mixture, and keep it in the fridge until dinner (or lunch) the next day. Recipe is below.

Bow Ties with Warm Blue Cheese Sauce by Robin Miller (slightly modified)
Serves 4

12 oz. farfalle pasta
2 tsp. olive oil
1/4 c. shopped shallots
1 teaspoon dried thyme
1/2 tsp salt
1/4 tsp freshly ground black pepper
2 cups milk
1/2 cup sour cream
1 c. crumbled blue cheese
1 cup frozen green peas

Cook the pasta according to package directions. Drain and transfer to a large bowl.
Meanwhile, heat the oil in a large skillet over medium heat. Add the shallots and cook, stirring, until tender, about 5 minutes. Stir in thyme, salt, and pepper until well mixed and thyme becomes fragrant. Add mixture to the cooked pasta and toss to combine.

Heat the milk in a large skillet over medium heat. When tiny bubbles appear around the edges of the pan, reduce heat to low and mix in sour cream and blue cheese. Stir until cheese melts. Add the peas and cooked pasta and simmer for 1 minute to heat through. Serve.

Wednesday, October 1, 2008

Shrimp, Garlic, and Tomato Bake


I love recipes that are easy to throw together but still taste decadent. To me, seafood, especially mussels and shrimp, always seems to have the potential to yield that result. For example, the following recipe is so easy to prepare, the first time I was ever served it, it was cooked over a campfire -- and it still tasted like a restaurant-quality appetizer. Immediately afterwards, I asked my mom for the recipe.

Raw tomato, garlic, and shrimp cook down and releases their flavours. A dollop of butter and a healthy sprinkling of salt and pepper enrich the flavour, while crusty bread served alongside completes the dish.

There really wasn't much of a recipe, just "a little this, a little that," so this is one you're going to have to eyeball. I've enhanced it a little bit to include extra broth for you to soak up with some crusty bread.


Shrimp, Garlic, and Tomato bake
Serves 1 - Main Course (2 as an appetizer)
Multiply the recipe accordingly -- it's pretty vague as is!
Raw shrimp, thawed, peeled, and deveined
Butter
Fish broth (optional)
1 medium tomato
Lots of garlic
Salt and pepper
A baguette or other crusty bread

1. Preheat oven to 375 degrees. Slice the baguette; set slices aside. Dice some tomato (about 1/4 of a medium tomato per 1 main course serving) set aside. Sprinkle shrimp into a buttered casserole dish -- 8x8" for 1-2 main course servings (2-4 appetizer servings) or 9x13" for more. Just eyeball it based on how many people you are serving or your own hunger level. As a guide, for a dinner portion, I had approximately 15 shrimp. Sprinkle the diced tomato over the shrimp.

2. If you'd like a lot of juices (to sop up with bread later), pour fish broth into the casserole until it comes no more than halfway up the sides of the shrimp. Add minced garlic to the shrimp mixture to taste. I like a lot of garlic, so I used 1.5 tbsp for one main course serving. Spoon butter -- 1 tbsp. per main course sized portion -- over the shrimp mixture.

3. Sprinkle with salt and pepper to taste. Bake casserole in the preheated oven until the shrimp is completely pink (cooked). Serve with bread.

  © Blogger templates 'Sunshine' by Ourblogtemplates.com 2008

Back to TOP